An extremely effective way to work out your upper body is with a pull-day workout. An essential part of the renowned ‘push, pull, legs‘ workout split. This workout method stands out as a superior choice for targeting muscles in the upper body. This isn’t just some popular workout trend. This is about adopting a strategic approach that’s been proven to maximize strength and muscular development. A good pull day is a cornerstone of a great modern fitness routine.
Thank you to coach Greg Luu for performing the exercises. Please consider checking him out for program inquiries!
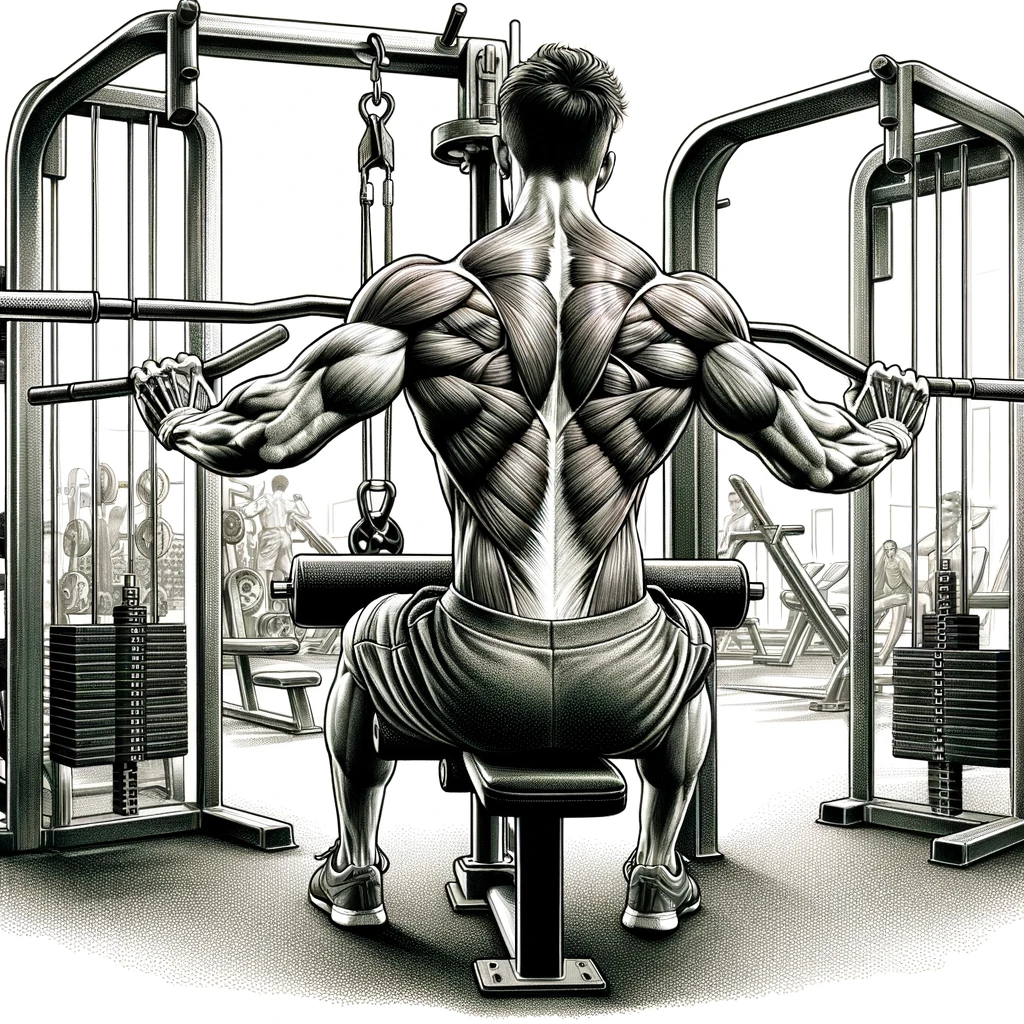
What is a Pull Day?
Pull day is essential for sculpting a strong back—a foundation strong enough to shoulder the weight of all your responsibilities, and then some. On pull day, you’ll dive into exercises that revolve around, you guessed it, pulling motions. Now, this might sound deceptively simple, but the muscle group synergy makes it extremely effective. Instead of tediously targeting each muscle group in isolation, focusing on functionally related muscle groups offers an uber-efficient workout.
Muscles Targeted on a Pull Day
Back
- Latissimus Dorsi
- The lats are among the largest muscles in the upper body, responsible for the adduction, rotation, and extension of the shoulder. They play a crucial role in movements that involve pulling the arms down or back.
- Trapezius
- Located in the upper back, the trapezius muscles are involved in moving, rotating, and stabilizing the scapula (shoulder blades). They contribute to a wide range of shoulder movements and help maintain proper posture. The traps are composed of three parts:
- Upper traps
- Middle traps
- Lower traps
- Located in the upper back, the trapezius muscles are involved in moving, rotating, and stabilizing the scapula (shoulder blades). They contribute to a wide range of shoulder movements and help maintain proper posture. The traps are composed of three parts:
- Rhomboids
- The rhomboids are muscles that play a key role in retracting the scapula, essentially pulling the shoulder blades together. They are vital for maintaining good shoulder alignment and posture.
- Erector Spinae
- This group of muscles runs along the spine and is important for maintaining posture and enabling spinal extension (straightening the back). They support the spine during lifting and help keep the back straight and stable.
Forearm
The forearms might appear straightforward at first glance, but in reality, they are a complex network of muscular groups, all working in harmony to facilitate the movement of your fingers and wrist. To simplify our understanding, I’ve divided the muscles in the forearm into two main categories.
- Flexors
- The forearm flexors are located on the anterior (palm side) part of the forearm. These muscles are primarily responsible for flexing the wrist and fingers. The flexors help the wrist bend forward and are responsible for finger dexterity. These muscles work together in coordination to perform complex hand and wrist movements, allowing for a wide range of activities from writing to playing musical instruments, and from lifting objects to performing fine motor skills.
The flexors are composed of:- Pronator teres
- Flexor carpi radialis longus
- Palmaris longus
- Flexor carpi ulnaris
- Flexor digitorum superficialis
- The forearm flexors are located on the anterior (palm side) part of the forearm. These muscles are primarily responsible for flexing the wrist and fingers. The flexors help the wrist bend forward and are responsible for finger dexterity. These muscles work together in coordination to perform complex hand and wrist movements, allowing for a wide range of activities from writing to playing musical instruments, and from lifting objects to performing fine motor skills.
- Extensors
- The forearm extensors are located on the posterior (back side) part of the forearm. These extensor muscles play a vital role in the balanced movement of the hand and wrist, counteracting the flexor muscles to allow for coordinated and precise manipulations of objects, supporting a wide range of everyday activities and specialized tasks.
The extensors are composed of:- Brachioradialis
- Extensor carpi radialis brevis.
- Extensor carpi radialis longus
- Extensor carpi ulnaris
- Extensor digitorum
- Extensor digit minimi
- Anconeus
- The forearm extensors are located on the posterior (back side) part of the forearm. These extensor muscles play a vital role in the balanced movement of the hand and wrist, counteracting the flexor muscles to allow for coordinated and precise manipulations of objects, supporting a wide range of everyday activities and specialized tasks.
Bicep
- Biceps Brachii
- This two-headed muscle is located on the front of the upper arm and is responsible for flexing the elbow and rotation of the forearm. (palms facing up) The brachii is composed of the:
- Short Head
- Long Head
- This two-headed muscle is located on the front of the upper arm and is responsible for flexing the elbow and rotation of the forearm. (palms facing up) The brachii is composed of the:
- Brachialis
- The primary purpose of the brachialis is elbow flexion.
The Anatomy of a Pull Day
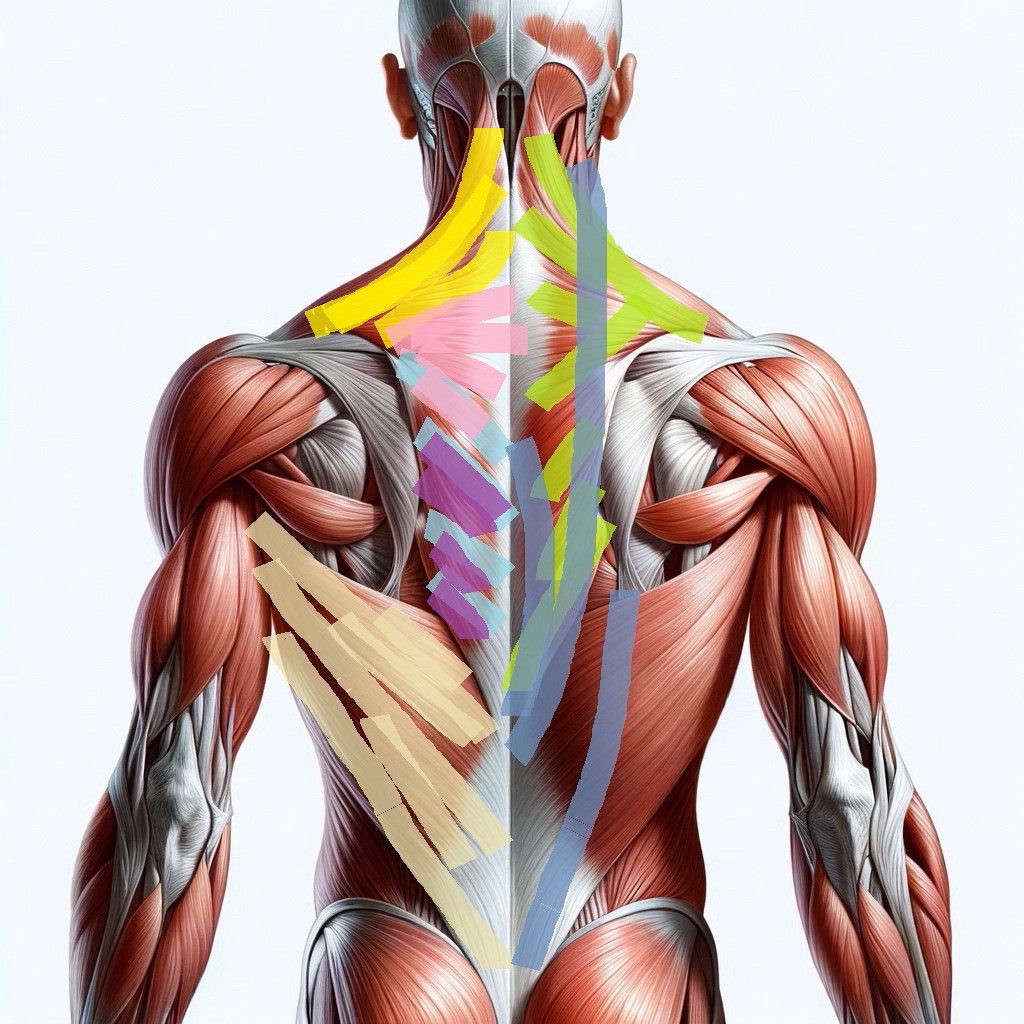
Back
The orange represents the latissimus dorsi muscles, commonly known as the lats. The green indicates the trapezius muscles, which are divided into three sections: the upper traps are highlighted in yellow, the mid traps in pink, and the lower traps in purple. The rhomboids are marked in light blue, and situated beneath the trapezius muscles. Lastly, the erector spinae muscles are shown in a darker, longer blue. (Up the back)
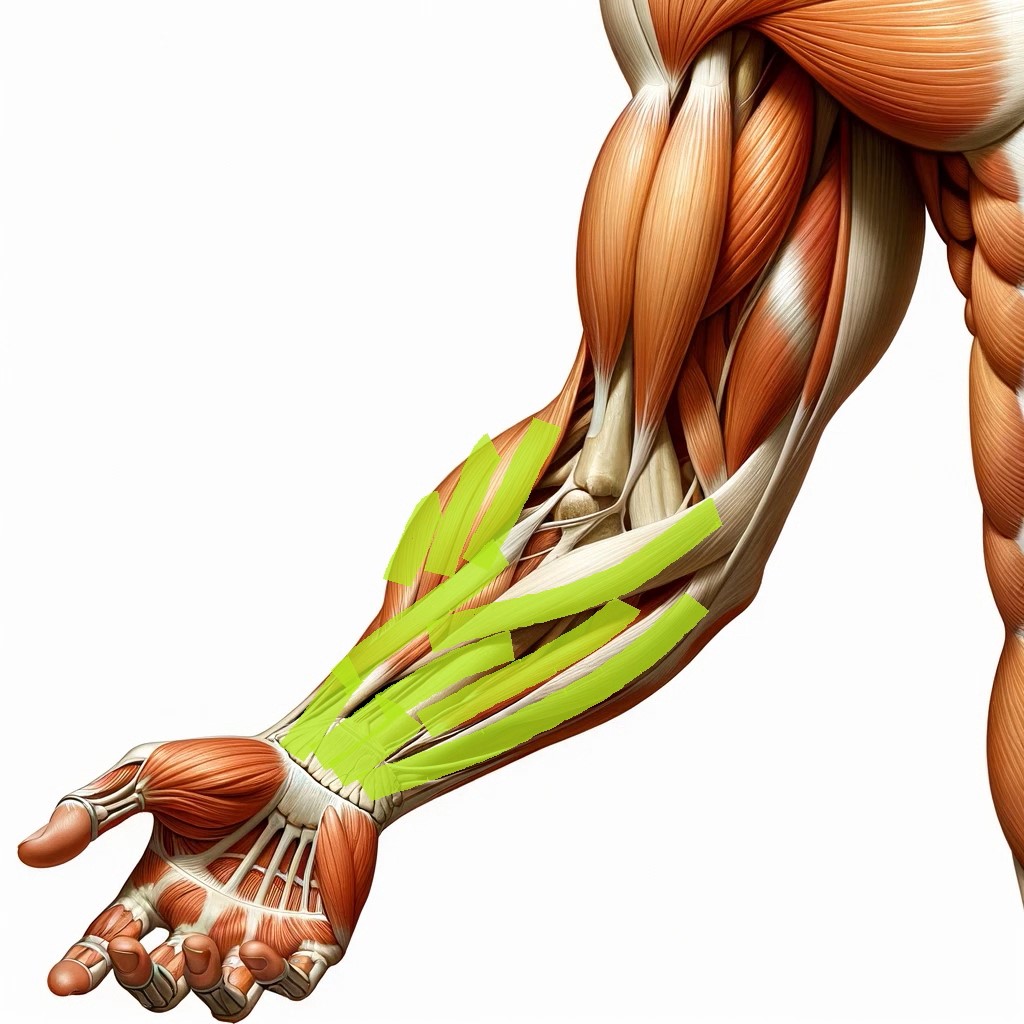
Forearm Flexors
The flexors are located on the same side of your palm. Remember forearms are a complex network of muscular groups, all working in harmony to facilitate the movement of your fingers and wrist. The flexors are composed of:
- Pronator teres
- Flexor carpi radialis longus
- Palmaris longus
- Flexor carpi ulnaris
- Flexor digitorum superficialis
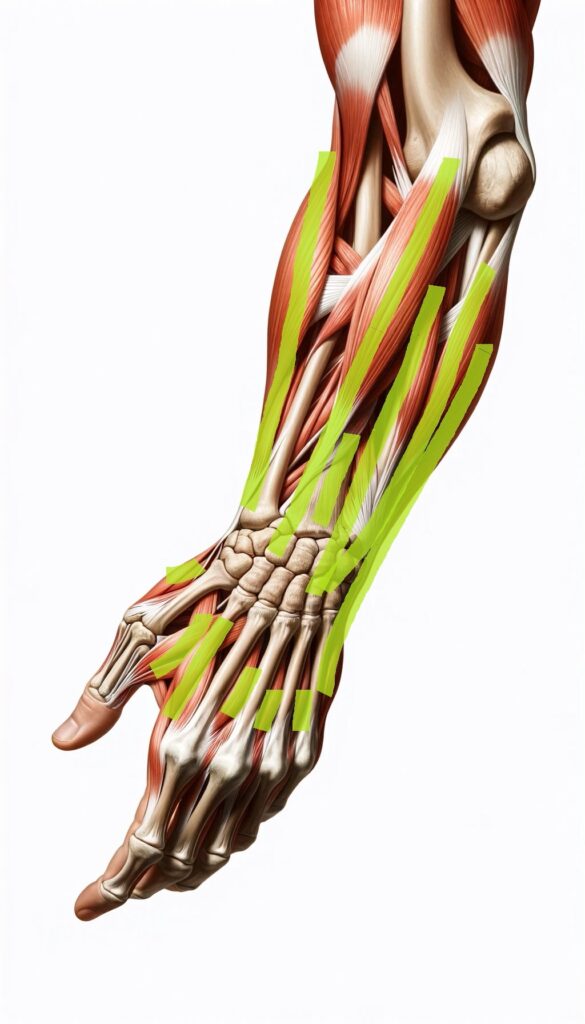
Forearm Extensors
The extensors are located on the same side as your wrist. Remember forearms are a complex network of muscular groups, all working in harmony to facilitate the movement of your fingers and wrist. The flexors are composed of:
- Brachioradialis
- Extensor carpi radialis brevis.
- Extensor carpi radialis longus
- Extensor carpi ulnaris
- Extensor digitorum
- Extensor digit minimi
- Anconeus
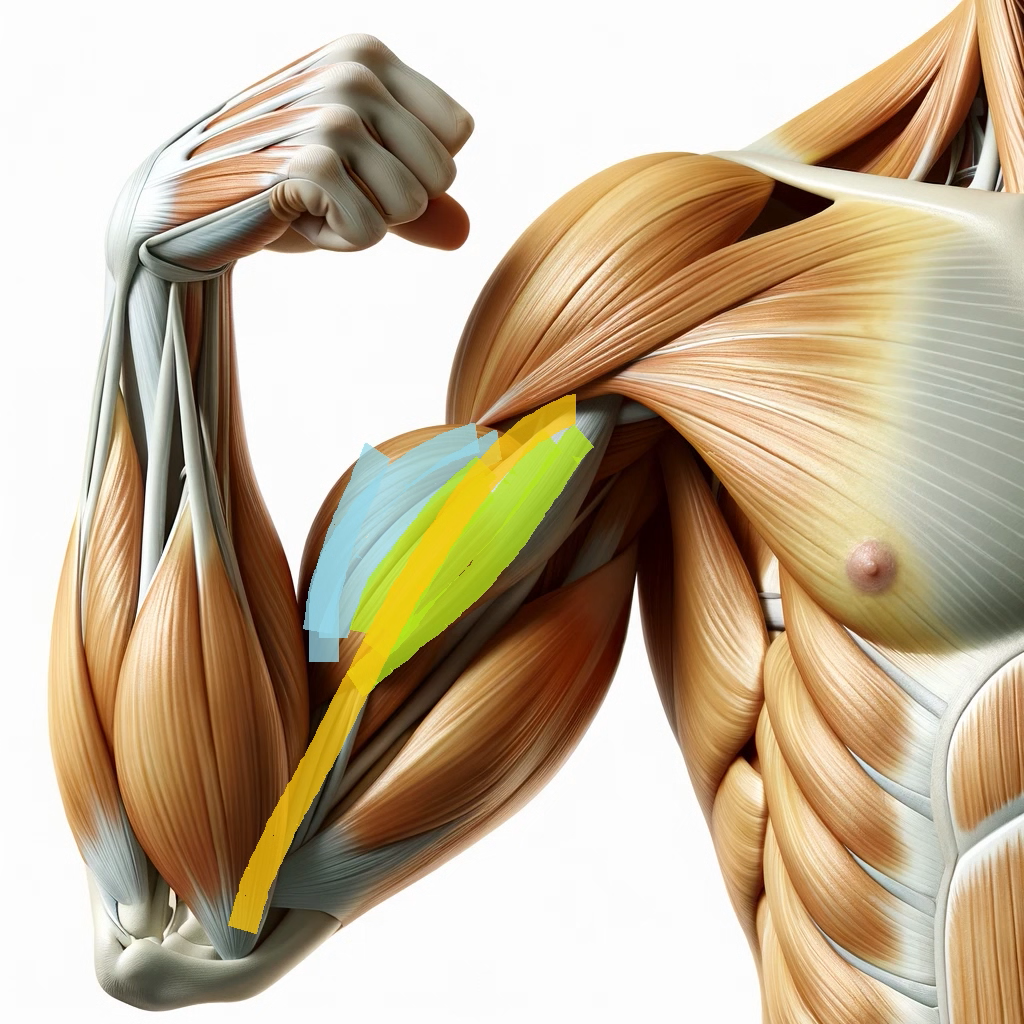
Bicep
The short head of the bicep is highlighted in green, while the long head is shown in blue. Beneath these, the brachialis muscle is indicated in yellow.
Pull Day Workout
The best part of this split is the muscle energy involved. Many back exercises engage your forearms due to the weight load. If you find your forearms fatiguing before your back, this may hinder your back gains because your forearms can’t handle the load. If this is the case, you may want to train your forearms specifically or purchase wrist straps to assist your forearms so you can focus more on your back.
Pull Up
Pull-ups are a compound exercise that targets multiple muscle groups, especially the muscles in your back, shoulders, and arms. While pull-ups are fantastic for the lats they also improve grip strength and enhance shoulder stability as well. If pull-ups are too difficult consider some other lat exercises.
- Grip the Bar: Stand under a pull-up bar and grab it with both hands. Your hands should be a little wider than shoulder-width apart, palms facing away from you (this is for a standard pull-up grip).
- Hang and Retract Your Shoulders: Let your body hang from the bar with your arms fully extended. Retract your shoulder blades slightly to engage the muscles in your back.
- Pull Yourself Up: Breathe out as you pull yourself up towards the bar by bending your elbows and driving them to the floor. Continue pulling until your chin is above the bar. The focus should be on using your back muscles.
- Pause at the Top: Once your chin is above the bar, hold the position for a second to maximize the muscle engagement in your lats and other upper body muscles.
- Lower Down Slowly: Breathe in as you slowly lower yourself back to the starting position, with your arms fully extended and your body hanging freely. Control is key during the descent to maximize muscle engagement and reduce the risk of injury.
Shrugs
Barbell shrugs are a great exercise focusing on the upper trapezius muscles. Avoid rolling your shoulders, as this can lead to injury.
- Grip the Bar: Stand under a pull-up bar and grab it with both hands. Your hands should be a little wider than shoulder-width apart, palms facing away from you (this is for a standard pull-up grip).
- Hang and Retract Your Shoulders: Let your body hang from the bar with your arms fully extended. Retract your shoulder blades slightly to engage the muscles in your back.
- Pull Yourself Up: Breathe out as you pull yourself up towards the bar by bending your elbows and driving them to the floor. Continue pulling until your chin is above the bar. The focus should be on using your back muscles.
- Pause at the Top: Once your chin is above the bar, hold the position for a second to maximize the muscle engagement in your lats and other upper body muscles.
- Lower Down Slowly: Breathe in as you slowly lower yourself back to the starting position, with your arms fully extended and your body hanging freely. Control is key during the descent to maximize muscle engagement and reduce the risk of injury.
Barbell Rows
Barbell rows are a compound exercise that targets multiple muscle groups in the back, as well as the shoulders, and arms. It’s an all-around great exercise to target the lats, mid/lower traps, and your rhomboids. It also engages the erector spinae as a stabilizer.
- Set Up:
- Begin by standing with your feet hip-width apart. Place a barbell in front of your feet.
- Grip and Stance:
- Bend at your knees slightly and hinge forward from your hips, keeping your back straight. Your torso should be almost parallel to the floor but slightly above.
- Grasp the barbell with an overhand grip (palms facing towards your legs), hands slightly wider than shoulder-width apart.
- Lift the Barbell:
- Lift the barbell by straightening your hips and knees to achieve a standing position. This is your starting position.
- Performing the Row:
- With your knees slightly bent, hinge at the waist to lower your torso back to the initial forward position, parallel to the ground.
- Keep your back straight and pull the barbell towards your lower chest or upper abdomen, leading with your elbows. Your elbows should go up and back, close to your body.
- Squeeze your shoulder blades together at the top of the movement.
- Return:
- Lower the barbell back to the starting position, maintaining control and keeping your torso stationary.
Barbell Deadlift
The deadlift is widely regarded as one of the most effective exercises for building overall strength and fitness due to its comprehensive range of benefits. It’s great not only for your erector spinae, but if done correctly, it also targets your traps. It works almost every back muscle you have; it’s also great for your legs, but that’s another story!
Note: This exercise is a HINGING motion, you drive your hips. Not an up-and-down motion with the back.
- Stand with Your Feet Hip-Width Apart: Position your feet under the barbell so that it is centered over your feet. Your feet should be hip-width apart, with toes pointing slightly outwards.
- Grip the Bar: Bend at the hips and knees to lower your body down to the bar. Grip the barbell just outside your legs using an overhand grip (both palms facing you) or a mixed grip (one palm facing you, one facing away) for heavier lifts.
- Set Your Posture: Lower your hips and bend your knees until your shins touch the bar. Keep your chest up and your back straight, with your shoulders slightly in front of the bar. Your spine should be in a neutral position from your head down to your tailbone.
- Drive Through Your Heels: Initiate the lift by pushing through your heels, straightening your knees, and extending your hips to lift the bar. Keep the bar as close to your body as possible as you rise.
- Lift Your Chest: As the bar passes your knees, focus on lifting your chest and driving your hips forward to stand up completely straight. Avoid hyperextending your back at the top of the movement.
- Engage Your Core: Throughout the lift, keep your core muscles tight to support your back. This engagement is crucial for protecting your spine.
- Hinge at the Hips: Begin the descent by hinging at the hips, pushing your buttocks back, and bending forward. It’s important to maintain a neutral spine as you lower the bar. (Optional: Grunt and make a face)
- Lower the Bar: Continue to lower the bar by bending your knees once it has passed knee level. The bar should travel straight down and land over the middle of your feet, in the same position from where you started.
- Reset: Before performing another rep, ensure that your feet are still hip-width apart, your grip is firm, and your posture is correct.
Underhand Lat Pull Down
Using the lat pull-down machine with an underhand grip targets the lower lats and simultaneously stimulates the biceps brachii like no other exercise. This exercise is perfect to target the biceps while engaging your lats, due to your back engagement you’re able to load this exercise with more weight resulting in larger gains.
- Adjust the Seat: Sit down on the lat pulldown machine and adjust the knee pad to fit snugly against your legs, preventing your body from lifting off the seat during the exercise.
- Grip the Bar: Reach up and grasp the bar with an underhand grip (palms facing towards you), hands spaced about shoulder-width apart or slightly narrower. This grip focuses the tension more directly on your biceps and lats.
- Sit Down With Proper Posture: Sit down with your thighs under the pads and your feet flat on the floor. Keep your back straight and chest slightly lifted throughout the exercise.
- Initiate the Pull: Exhale as you pull the bar down towards your chest. Lead with your elbows and imagine pulling them down and back towards your hips to fully engage the lat muscles.
- Mind the Bar Path: Aim to bring the bar down to just below chin level or to the upper chest. Keep the bar close to your body to maximize lat engagement.
- Squeeze at the Bottom: In the bottom position, squeeze your shoulder blades together and hold for a moment to maximize the contraction in the lats and mid-back muscles.
- Control the Ascent: Inhale as you slowly let the bar ascend back to the starting position. Ensure the movement is controlled to maintain tension on the target muscles throughout.
- Maintain Form: Throughout the exercise, keep your core engaged, and avoid leaning too far back or using momentum to lift the weight. Your body should remain relatively upright, with a slight natural arch in your lower back.