An extremely effective way to work out your lower body is with a leg day workout. An essential part of the renowned ‘push, pull, legs’ workout split. This workout method stands out as a superior choice for targeting muscles in the lower body. This isn’t just some popular workout trend. This is about adopting a strategic approach that’s been proven to maximize strength and muscular development. A good pull day is a cornerstone of a great modern fitness routine.
Thank you to coach Greg Luu for performing the exercises. Please consider checking him out for program inquiries!
What is a Leg Day?
Leg day is crucial for maintaining a strong lower body, ensuring your legs are strong enough to withstand any hardships in life and keep you upright. The primary focus on leg day is on the legs, hips, and glutes. The objective is to fortify your lower body, offering ample support and stability for your entire body. After all, your legs carry the rest of your body and take you wherever you need to go. Therefore, you should never skip leg day!
Muscles Targeted on a Leg Day
Quadriceps
The quadriceps, or “quads,” are the powerhouse at the front of your thigh, composed of four muscles. These muscles are essential for walking, extending your knee, and flexing your hip. Their strength and flexibility play a pivotal role in your every movement, making them a crucial element of your lower body’s mechanics. Whether you’re sprinting to catch a bus, performing a squat, or simply climbing stairs, your quads are at the forefront of the action, driving you forward and supporting your mobility.
- Vastus Medialis
The Vastus Medialis, located on the inner thigh, is crucial for stabilizing the kneecap, ensuring smooth and aligned knee movements in every activity. - Vastus Intermedius
Situated beneath the rectus femoris at the front of the thigh, its main role is to extend the knee. - Vastus Lateralis
The Vastus Lateralis, the largest and outermost of the quadriceps muscles on the thigh’s side, stands out as the strongest among the four. It consistently contributes to knee extension. - Rectus Femoris
Unique for spanning both the hip and knee joints, the Rectus Femoris performs dual functions: knee extension and hip flexion.
Hamstrings
The hamstrings, a group of three muscles at the back of the thigh, play a crucial role in many daily activities. Their significance lies in their key functions and contributions to overall mobility and stability, making them essential for a wide range of movements.
- Biceps Femoris
The biceps femoris, an integral hamstring muscle at the back of the thigh, is pivotal for bending the knee and extending the hip. Essential for activities such as walking, running, and standing up, it plays a significant role in leg movement and stability. - Semitendinosus
Positioned in the middle of the hamstring group, the semitendinosus is a key muscle at the back of the thigh. It is vital for bending the knee and extending the hip, contributing to leg stability, movement, and injury prevention. - Semimembranosus
Stretching from the pelvis to the tibia in the lower leg, this muscle plays a key role in knee flexion by assisting in bending the knee and in hip extension by helping move the thigh backward.
Adductors
The adductors in the legs are a group of muscles located on the inner thigh. Their primary function is to close the thigh. This movement is essential for various activities that involve moving the legs together, such as when crossing your legs, squeezing the thighs together, or stabilizing the pelvis during walking or running. The adductors are composed of:
- Adductor longus
- Adductor brevis,
- Adductor magnus
- Gracilis
- Pectineus
Abductors
The abductors are a group of muscles located on the outer part of the thigh and hip. Their primary function is to open the thigh. This action is crucial for various movements and activities, including walking, running, and maintaining balance and stability. The muscles are:
- Gluteus medius
- Gluteus minimus
- Tensor fasciae latae
- Piriformis
- Sartorius
Glutes
Some of the muscles that make up the glutes are also part of the abductors. Strong glutes are essential for hip movement, pelvic and spine support, and many day to day movements.
- Gluteus maximus
The gluteus maximus is the largest and most superficial of the three gluteal muscles. Meaning it makes up most of your butt! It also helps stabilize the lower body and postural support. - Gluteus medius
Situated between the gluteus maximus and gluteus minimus. The gluteus medius plays several crucial roles in the movement and stabilization of the hip and pelvis, making it vital for proper locomotion and posture. - Gluteus minimus
The gluteus minimus is the smallest of the three gluteal muscles, located beneath the gluteus medius. Despite its size, the gluteus minimus plays a crucial role in the movement and stabilization of the hip joint and pelvis.
Calves
The calves are a group of muscles located at the back of the lower leg, below the knee, made up of three muscles. The calves assist with mobility but they also assist in pumping blood back to the heart from the lower body!
- Gastrocnemius
The gastrocnemius muscle is a major muscle located in the back part of the lower leg, and it is one of the two muscles that make up the calf. It is a very prominent muscle, contributing to the calf’s shape and definition. This muscle lets you do actions like pressing down on a gas pedal, standing on your tipy toes, etc. - Soleus
The soleus is a powerful muscle in the lower part of the leg. It also assists in pumping blood back into the heart. - Plantaris
The plantaris muscle is a small, thin muscle located in the back compartment of the leg, running alongside the larger calf muscles, the gastrocnemius, and the soleus. It’s considered to be a vestigial muscle, meaning it has lost most of its functionality through human evolution
The Anatomy of a Leg Day
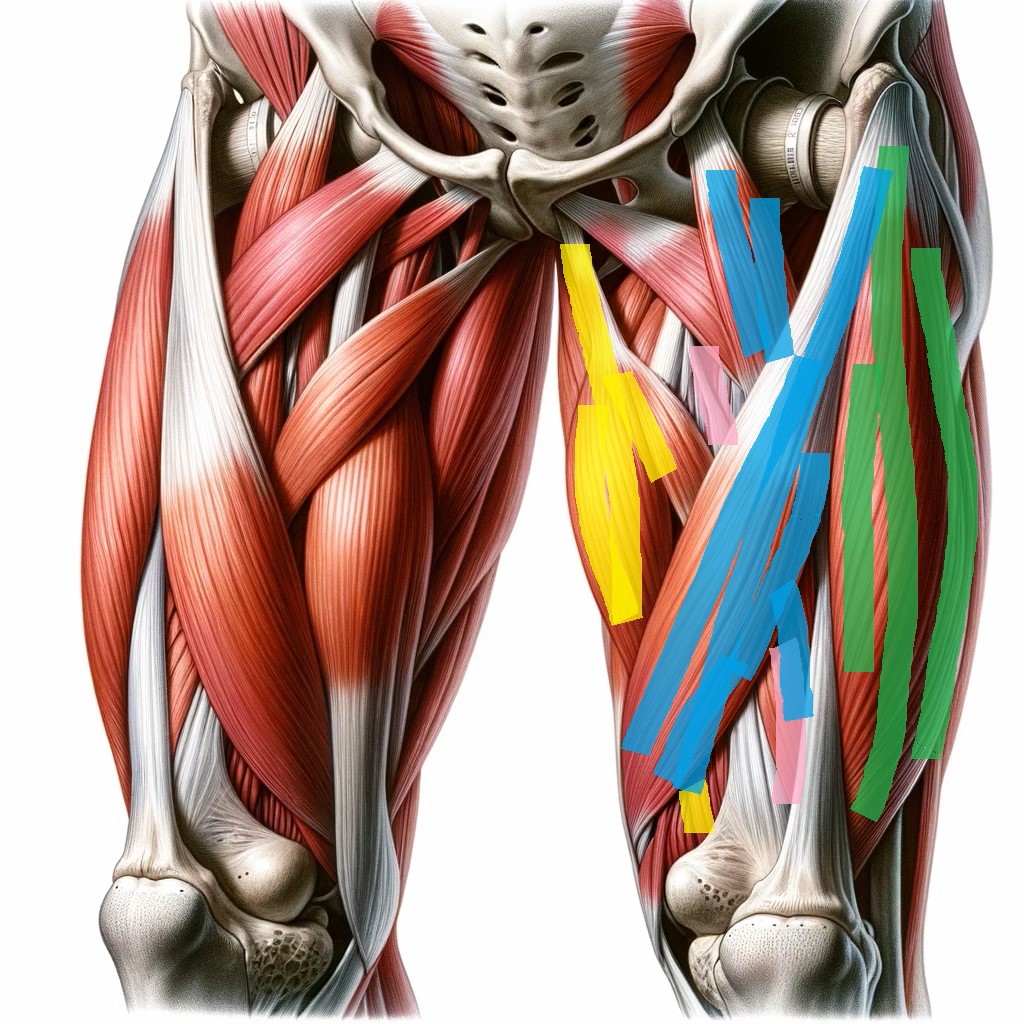
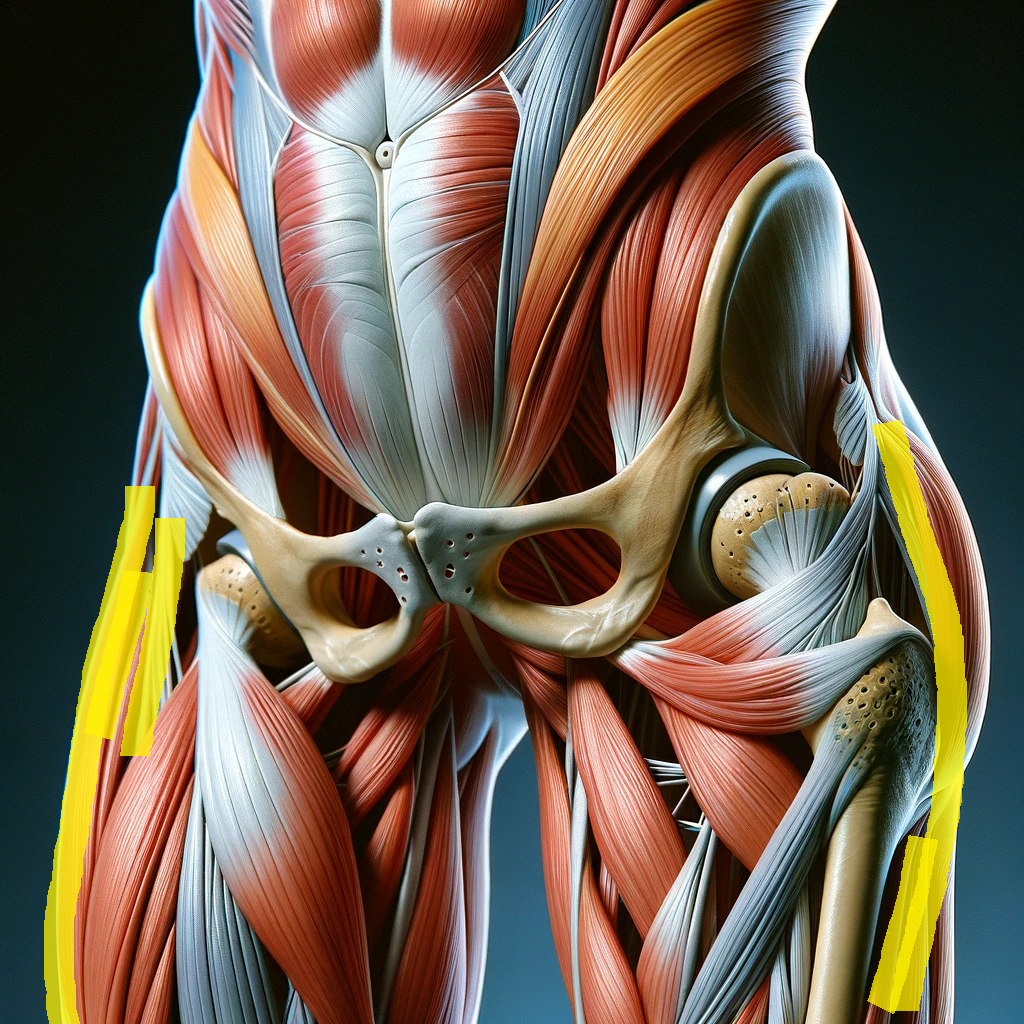
Quadriceps
The vastus medialis, located on the inner thigh, is highlighted in yellow. Positioned beneath the medialis, the vastus intermedius is highlighted in pink. The vastus lateralis, on the outer thigh, is highlighted in green. The rectus femoris, highlighted in blue, is the only muscle that crosses both the hip and knee joints.
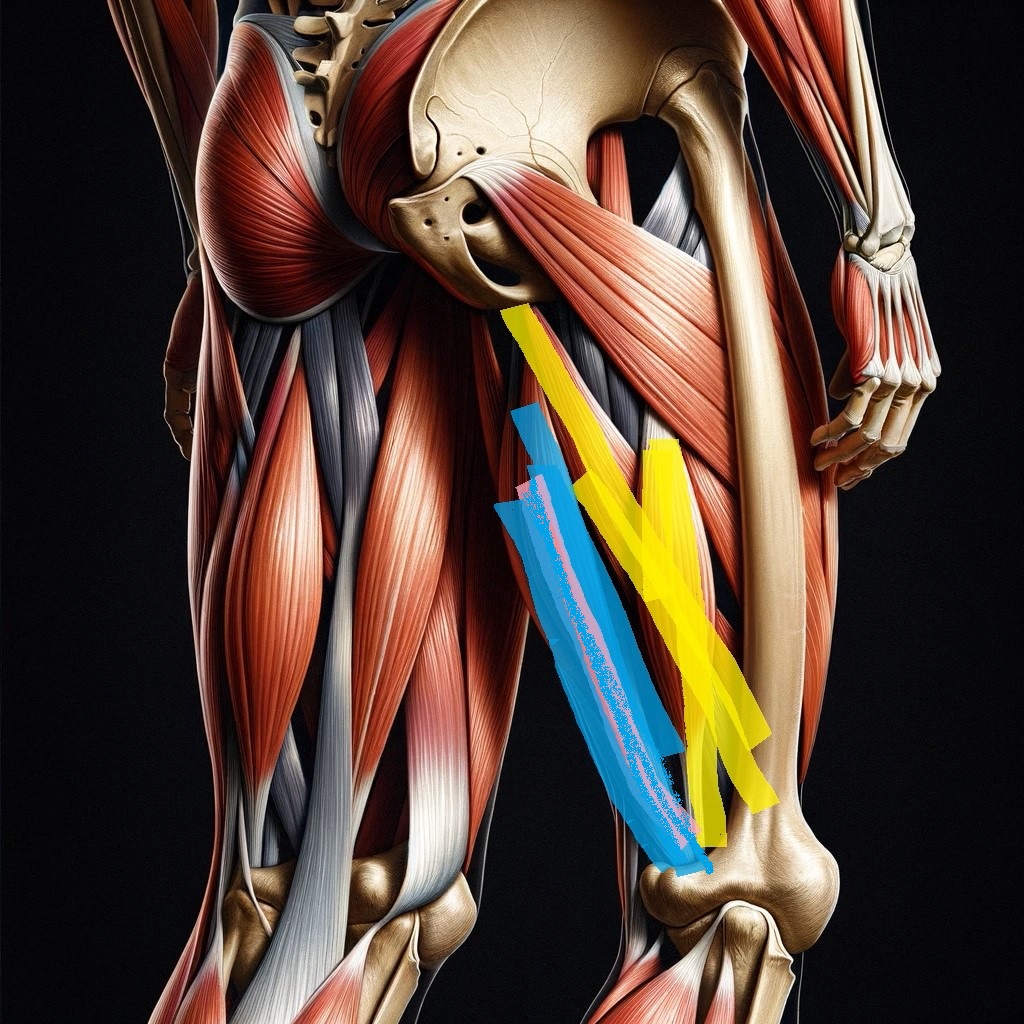
Hamstrings
The biceps femoris, highlighted in yellow, is the outer component of the hamstring. The semitendinosus occupies the middle portion of the hamstring highlighted in blue. Located beneath the semitendinosus is the semimembranosus highlighted in pink.
Adductors
The primary function of your leg adductors is to draw your legs towards the center of your body. This movement contrasts with the action of your abductors, which move your legs away from your body’s midline. Your adductors work by pulling your legs inward, towards one another, playing a crucial role in maintaining the stability and support of your lower body. The adductor muscles include:
- Adductor longus
- Adductor brevis,
- Adductor magnus
- Gracilis
- Pectineus
Abductors
Your leg abductors are muscles situated on the outer part of your thighs and hips. Their primary function is to facilitate the movement of your legs away from the center of your body. For instance, when you step sideways, exit a car, or perform a side stretch, you engage your abductor muscles. The muscles that make up the abductors include:
- Gluteus medius
- Gluteus minimus
- Tensor fasciae latae
- Piriformis
- Sartorius
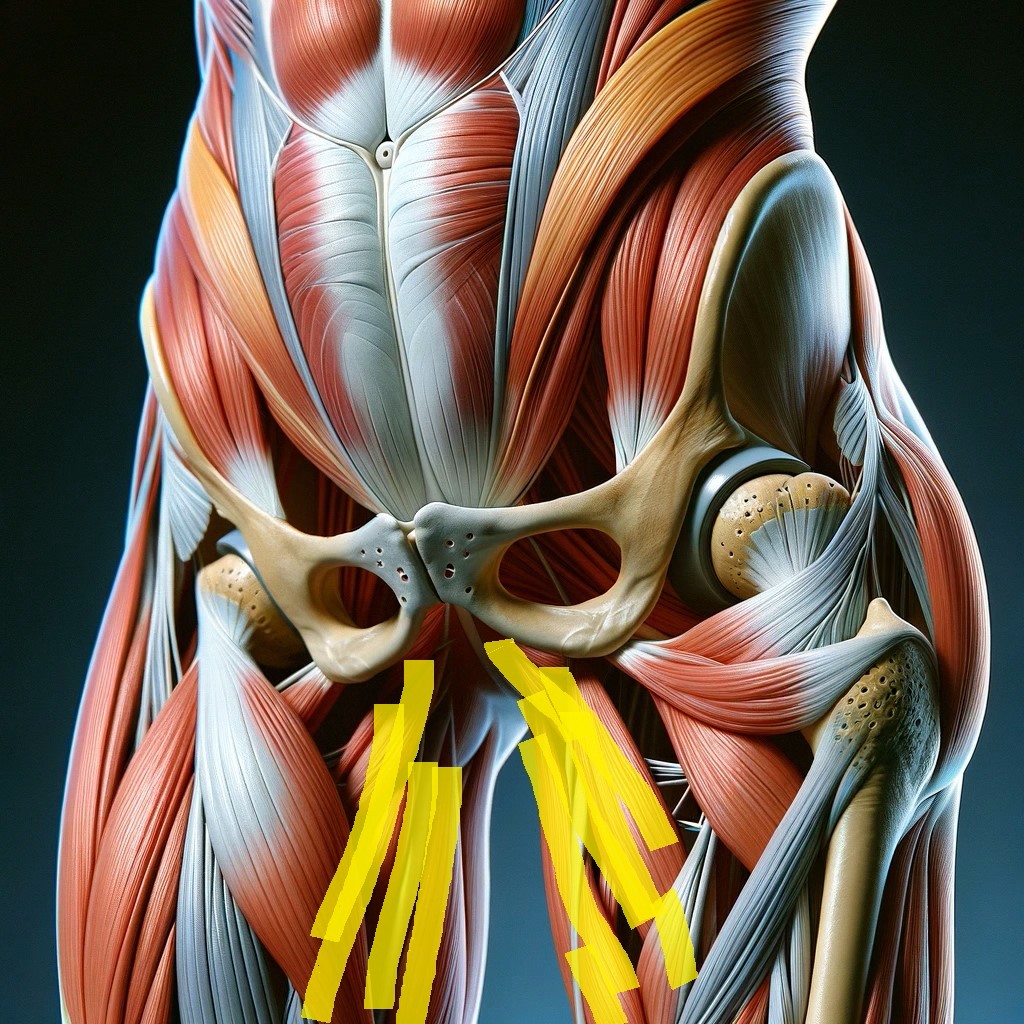
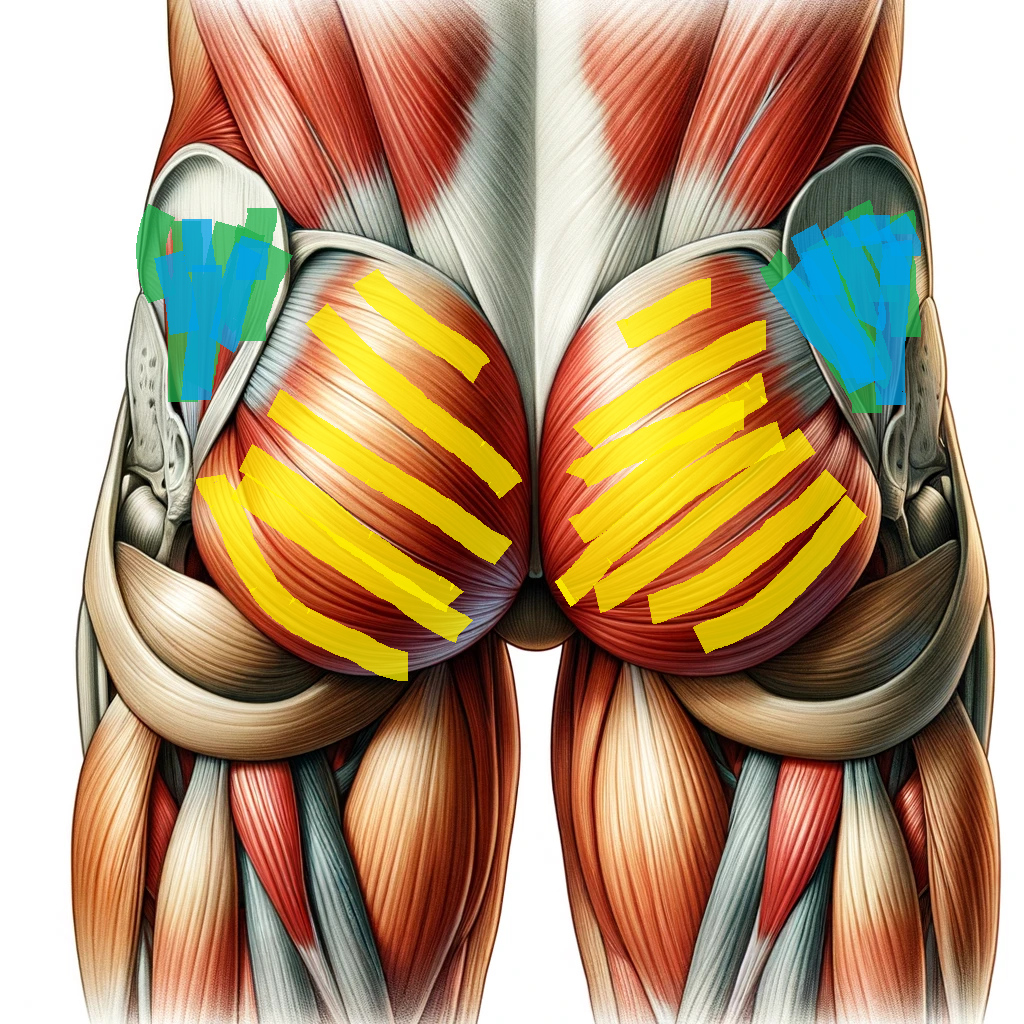
Glutes
The thickest and largest muscle in the glutes, the gluteus maximus, is highlighted in yellow. Located on the around your hips, the gluteus medius is highlighted in blue. Beneath this medius, you’ll find the gluteus minimus, which is highlighted in green
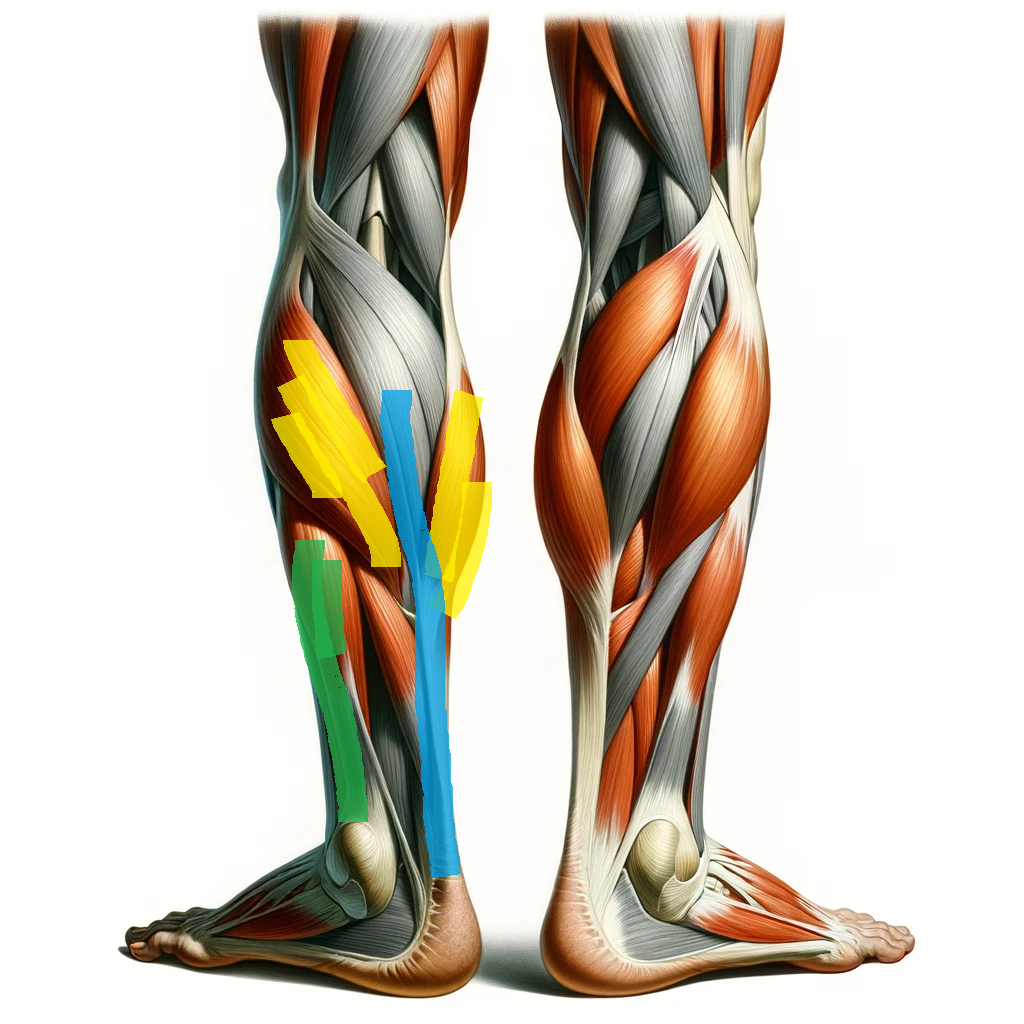
Calves
The gastrocnemius is highlighted in yellow its the biggest muscles in the calves. Soleus is highlighted in green its located underneath the gastrocnemius. The plantaris is a small, thin muscle located in the leg, running from the lower end of the femur to the Achilles tendon in the heel highlighted in blue.
Leg Day Workout
Incorporating a leg day into your fitness routine offers numerous benefits, making it an essential component for anyone looking to enhance their physical health and athletic performance. Strong legs are fundamental to almost every athletic activity, enhancing speed, agility, and endurance, while also providing the added advantages of better balance and stability, reduced injury risk, and improved posture and back health. Moreover, focusing on your legs ensures a symmetrical physique and supports everyday functional movements, leading to a higher quality of life. In summary, the importance of leg day extends beyond the gym, impacting overall well-being and physical performance.
Many fitness enthusiasts also combine leg day with their shoulders, as numerous exercises have great shoulder and leg muscle synergy.
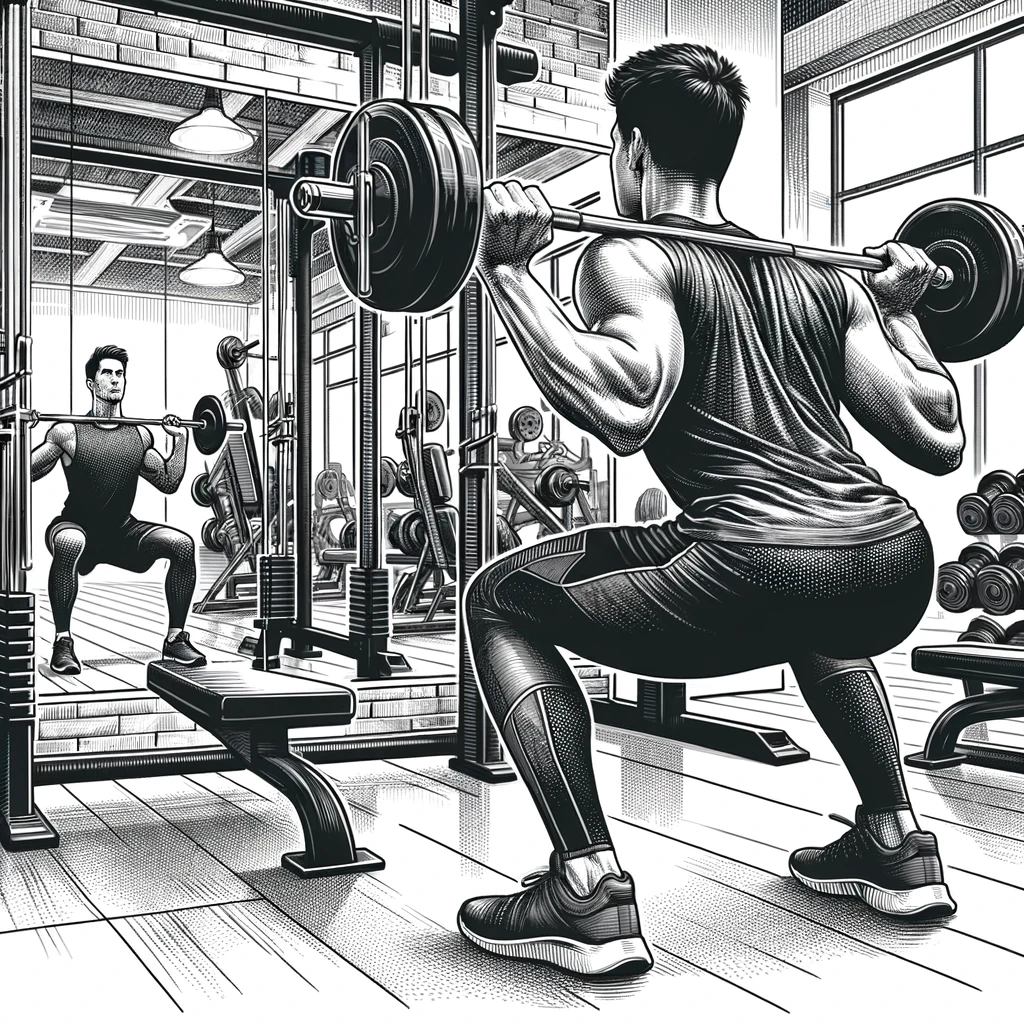
Squats
Squats. Known to make you thicker than overnight oats covered in peanut butter. Squats are hailed as one of the most effective exercises due to their comprehensive ability to engage and strengthen multiple muscle groups simultaneously, including the quadriceps, hamstrings, glutes, lower back, and core. This compound movement not only aids in building muscle mass and strength but also enhances flexibility, balance, and coordination
- Starting Position: Stand with your feet shoulder-width apart, toes slightly turned out. You can extend your arms in front of you for balance or keep them by your sides.
- The Descent: Begin by pushing your hips back as if you’re sitting in a chair. Bend your knees while keeping your chest up and back straight. Ensure your knees do not go over your toes significantly.
- Depth of the Squat: Aim to lower yourself until your thighs are at least parallel to the floor. If you can go lower while maintaining form, that’s beneficial but not necessary.
- The Ascent: Push through your heels to return to the starting position. Engage your core and glutes as you rise. Avoid locking your knees at the top of the movement.
- Breathing: Inhale as you lower down and exhale as you come up. Proper breathing helps maintain intra-abdominal pressure, which supports your spine during the exercise.
Leg-press
By focusing on the quadriceps, hamstrings, glutes, and calves, the leg press provides a stable and effective way to build muscle mass and improve lower body performance without the balance and coordination demands of free-weight exercises. Its machine-based nature offers added safety and support, making it an excellent option for beginners, those with balance issues, or individuals rehabilitating from injury.
- Adjust the Seat: Before starting, adjust the seat of the leg press machine so that when you sit down, your knees are bent at about a 90-degree angle. This positioning is crucial for a full range of motion and to prevent any unnecessary strain on your knees.
- Select Your Weight: Choose a weight that is challenging but allows you to perform the exercise with proper form. It’s better to start lighter and gradually increase the weight as you become more comfortable with the movement.
- Position Yourself: Sit on the machine with your back and head resting comfortably against the padded support. Place your feet shoulder-width apart on the sled. Your feet should be flat against the sled, and the balls of your feet should not be hanging off the edge.
- Unlock the Safety: Most leg press machines have safety locks. Make sure to release these before starting the exercise.
- The Descent: Slowly lower the sled towards you by bending your knees. Keep lowering the sled until your knees form a 90-degree angle. The exact angle might vary based on your flexibility and the machine’s design, but avoid going so deep that your lower back starts to round.
- Pressing Up: Push the sled away from you by extending your legs. Focus on using your quadriceps, hamstrings, and glutes to do the work. Do not lock your knees at the top of the movement to prevent joint strain.
- Breathing: Inhale as you lower the sled and exhale as you press it back up. Proper breathing helps maintain intra-abdominal pressure, which supports your spine during the exercise.
- Re-engage Safety Locks: Once you have completed your set, make sure to lock the safety latches if your machine is equipped with them.
Leg-extension
A staple in many fitness routines due to its specific focus on strengthening and isolating the quadriceps. Incorporating the quadriceps curl machine into a balanced lower-body workout routine can significantly benefit muscle strength, knee stability, and overall leg development.
- Adjust the Seat: Position the seat so that when you sit down, your knees are at the edge of the seat, and the knee joint aligns with the machine’s pivot point.
- Adjust the Shin Pad: The pad should rest on the lower part of your shins, just above your feet. It should not be too high (on the knee) or too low (on the ankles).
- Select Your Weight: Start with a lightweight to ensure you can perform the exercise with proper form. You can gradually increase the weight as you become more comfortable.
- Sit Down and Position Your Legs: Sit on the machine with your back flat against the backrest. Place your legs under the pad, adjusting your legs so the pad rests on the lower part of your shins.
- Grip the Handles: Hold onto the side handles of the machine. This will help stabilize your body during the exercise.
- Perform the Extension:
- Exhale and slowly extend your legs at the knees, raising the weight until your legs are almost fully extended in front of you. Keep your back firmly against the backrest, and avoid arching your back.
- Ensure the movement is controlled and focused, with the quadriceps doing the work.
- Return to Starting Position:
- Inhale and slowly lower the weight back to the starting position in a controlled manner. Your feet should not touch the ground between repetitions.
- Avoid Locking Your Knees: Do not lock your knees at the top of the movement to prevent unnecessary strain on the knee joints.
Hamstring Curl
Hamstring curls primarily strengthen the hamstrings, contributing to muscle balance, injury prevention, improved athletic performance, better posture, increased flexibility, and enhanced functional ability for daily activities. The hamstring curl machine isolates the hamstrings, allowing you to add more weight for targeted muscle development.
- Start Position:
- Lie face down on the hamstring curl machine with your legs straight. Adjust the machine so that the lever pad is just above your heels or on your lower calves.
- Ensure your thighs and torso are comfortably supported on the bench. Grip the machine’s handles or the bench itself for stability.
- Performing the Curl:
- Exhale and slowly curl your legs up towards your buttocks by bending at the knees. Keep the motion smooth and controlled, focusing on using your hamstrings to pull the weight.
- Continue curling up until your hamstrings are fully contracted and the machine’s lever pad reaches close to your buttocks, but avoid lifting your hips off the bench.
- Pause and Return:
- Hold the contracted position for a moment, then inhale as you slowly lower the weight back to the starting position. Keep the movement controlled; avoid letting the weight stack drop quickly.
Calf Raises
Calf raises are a simple yet highly effective exercise targeting the calf muscles, specifically the gastrocnemius and soleus muscles. These exercises offer numerous benefits, making them a valuable addition to any fitness routine
- Starting Position
- Stand upright with your feet hip-width apart. You can perform this exercise on a flat surface or on the edge of a step for a greater range of motion. If you’re using a step, position the balls of your feet on the edge with your heels hanging off.
- For balance, you may hold onto a wall, railing, or a sturdy piece of equipment.
- The Movement
- Slowly lift your heels off the ground, rising onto your toes as high as possible. Focus on using the calf muscles to perform this movement; the rest of your body should remain static.
- Pause at the top of the movement for a moment to maximize the contraction in your calf muscles.
- Lowering Phase
- Slowly lower your heels back down below the level of the step or back to the floor, returning to the starting position. If you’re on a step, you can lower your heels below the level of the step for a deeper stretch.
- Use an elevated surface to get a better stretch in the calf.
- Hold one dumbbell for better isolation. You can also hold two dumbbells for extra weight.
Barbell Deadlift
The deadlift is widely regarded as one of the most effective exercises for building overall strength and fitness due to its comprehensive range of benefits. It’s great not only for your erector spinae, but if done correctly, it also targets your traps. It works almost every back muscle you have; it’s also great for your legs, but that’s another story!
Note: This exercise is a HINGING motion, you drive your hips. Not an up-and-down motion with the back.
- Stand with Your Feet Hip-Width Apart: Position your feet under the barbell so that it is centered over your feet. Your feet should be hip-width apart, with toes pointing slightly outwards.
- Grip the Bar: Bend at the hips and knees to lower your body down to the bar. Grip the barbell just outside your legs using an overhand grip (both palms facing you) or a mixed grip (one palm facing you, one facing away) for heavier lifts.
- Set Your Posture: Lower your hips and bend your knees until your shins touch the bar. Keep your chest up and your back straight, with your shoulders slightly in front of the bar. Your spine should be in a neutral position from your head down to your tailbone.
- Drive Through Your Heels: Initiate the lift by pushing through your heels, straightening your knees, and extending your hips to lift the bar. Keep the bar as close to your body as possible as you rise.
- Lift Your Chest: As the bar passes your knees, focus on lifting your chest and driving your hips forward to stand up completely straight. Avoid hyperextending your back at the top of the movement.
- Engage Your Core: Throughout the lift, keep your core muscles tight to support your back. This engagement is crucial for protecting your spine.
- Hinge at the Hips: Begin the descent by hinging at the hips, pushing your buttocks back, and bending forward. It’s important to maintain a neutral spine as you lower the bar. (Optional: Grunt and make a face)
- Lower the Bar: Continue to lower the bar by bending your knees once it has passed knee level. The bar should travel straight down and land over the middle of your feet, in the same position from where you started.
- Reset: Before performing another rep, ensure that your feet are still hip-width apart, your grip is firm, and your posture is correct.