What Are the Lats?
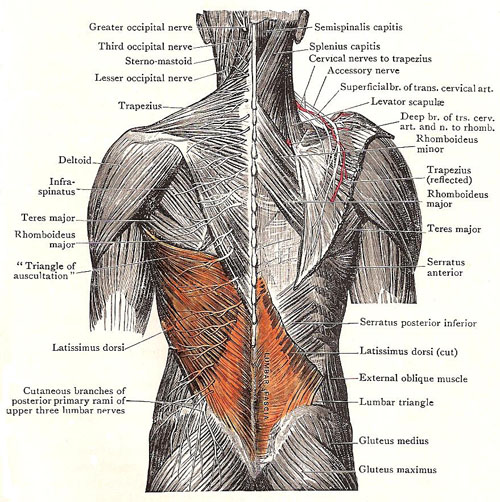
The Latissimus dorsi, commonly referred to as the “lats,” is located in the upper and middle back. It is a large, flat muscle that spans the width of the back and has a broad, fan-like shape. It begins from the lower part of the spine, extending up and out towards the upper arm. To be scientific and more specific, the lats extend from the thoracic and lumbar vertebrae (T7-L5) to the humerus. So, you can imagine that this is quite a large muscle, one that should not be neglected!
Why Should I Train Lats?
The lats contribute to your everyday life more than you might think. They play a huge role in stabilizing our spine, helping us keep upright and maintain our posture, assist in breathing, and are involved in any pulling motion. Well-developed lats will make your back appear much wider, which in turn makes your waist look thinner in comparison, creating a V-taper body type. Most importantly, you should train your lats to stand proud, pull and hold your loved ones close, and to have a strong back to endure hardships.
The Best Lat Exercises For Beginners
Since this is a beginner’s guide these exercises are going to be more focused on isolation exercises. Compound exercises are fantastic but the technique is harder to grasp since there are more moving parts making the exercises a little more complex. The 2 types of exercises we will cover will essentially work out the whole lat.
I had the incredible opportunity to work with of Coach Greg Luu, who is based in Atlanta. For anyone in the Atlanta area looking to elevate their fitness journey, I highly recommend checking him out. You can find him on Instagram under the handle @luupowerlifting. Give his page a visit and consider following!
Kneeling One Arm Lat Pulldowns (Kneeling Cable Row)
The benefit of this exercise is that it not only targets a large portion of the lat but also, as a unilateral exercise, it can help correct any muscular imbalances. This exercise allows your lats to work through their full range of motion, creating maximum stretch, which is crucial for muscle building.
Front Leg On Pulling Side VS Pulling On Opposite Side
There are actually benefits to both methods of pulling, whether using the same or opposite leg. With the opposite leg forward, you increase your stability, meaning you can add more weight or load to your lats, creating more resistance and, theoretically, more muscle growth (keeping good technique in mind). With the same side leg forward, you will increase oblique activation (oblique sling), which is great depending on your training purposes. However, since we are focused on the lats, the examples will be with the opposite leg and hand.
Hand Position
Palm facing toward you, away from you, or sideways? These are all valid positions that make subtle changes to your exercise, but the primary focus of this exercise is the lats. Since we’re just starting out, do what feels most comfortable but be mindful of which muscle is being worked. Don’t turn this into a bicep exercise by just pulling with your arms; instead, focus on pulling down by trying to bring your elbow down to your hips.
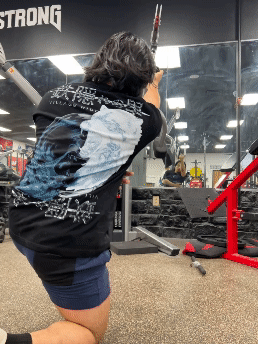
- Use a single grip handle. Make sure the pully is a good distance away from your head to ensure your muscles will get a good stretch.
- Kneel (Staggered) a few feet away from the point of resistance in the pully, with your arm extended above and in front of you.
- Pull down, towards your HIP. This will engage more of your lats. Avoid using the bicep for this exercise. Try to really feel that mind-to-muscle connection.
Single Hand Lat Pull Down Variation
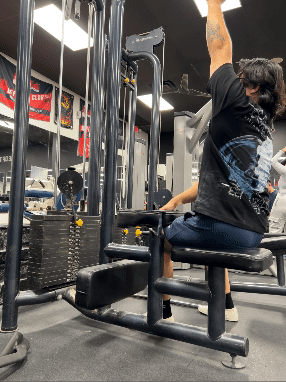
- This variation provides more stability if you’re having trouble doing kneeling rows. You can do this at the seated lat pull-down machine. You can sit normally or have both legs on the same side to focus on the lats.
- You want to keep a straight posture and tight abs.
- The concept is the same where you really want to drive your elbow to your hip for the maximum muscle stretch and range of motion.
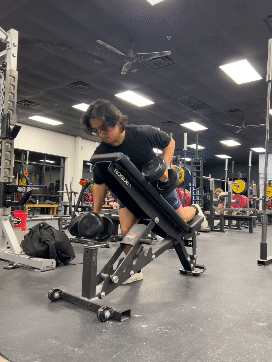
Chest Supported Rows
The technique for a row can be difficult to understand at first but with a few reps, you should be able to feel your lats being worked. Doing a chest support row provides more stability and isolates your lats helping you focus more on technique rather than using your effort to stabilize yourself. Your back will thank you for this later!
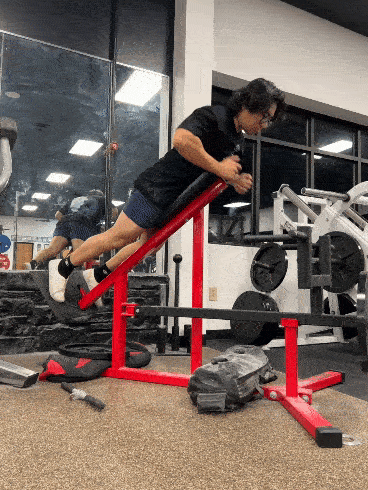
- Sent the incline to 45 degrees. Have a neutral grip
- Lay belly flat on the bench. Some individuals may find it more comfortable with their chest barely above the bench. Play around and find what position works best for you.
- Squeeze your shoulder blades together and pull towards your hips or drive your elbows to the ceiling while keeping your elbows tucked in.
Chest Supported Row Dumbbell Variation
If you don’t have a machine specially for chest-supported rows, fear not! You can make your own at almost any commercial gym. You can set a bench to 45 degrees. You want to use the bench to lean the weights and slowly position yourself in the starting position. You can use your legs to help support you or if you want to try to isolate your back you can rest your knees on the bench,. From here the technique is all the same.
- Sent the incline to 45 degrees. Have a neutral grip.
- Have your chest resting on the bench with your head above it.
- Squeeze your shoulder blades together and pull towards your hips or ceiling. If you want to feel for more of your lats try to tuck your elbows a little more in rather then flaring them out. (not tucked in all the way)